
Setting up an Ubuntu Server VM in Windows 8 Hyper-V
Configuring Hyper-V, setting up the vm, installing Ubuntu Server, and finally configuring the server.
This is a brief tutorial on how to setup a virtual machine on Hyper-V in Windows 8 running Ubuntu Server; and then more importantly be able to communicate with it from within the host operating system.
The first step is to enable Hyper-V, instructions for Windows 8/8.1 are linked. The system requirements and actually installing/setting up Hyper-V are beyond the scope of this article. Once Hyper-V is working then follow these steps:
Windows (host) setup
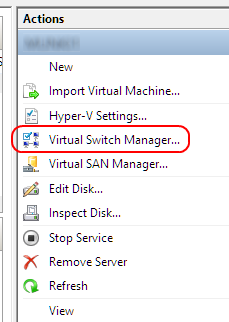
- Open Hyper-V Manager ( you’ll be able to fins it easily enough using the search charm).
- In the right hand panel select Virtual Switch Manager…
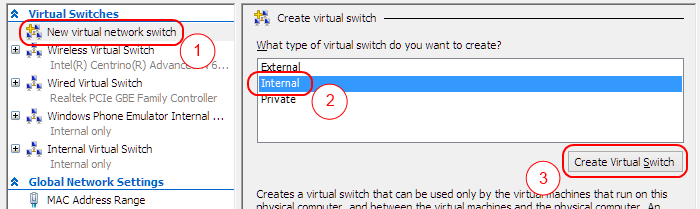
- In the Virtual Switch Manager select New virtual network switch (1); then click on Internal (2); finally click on Create Virtual Switch (3)
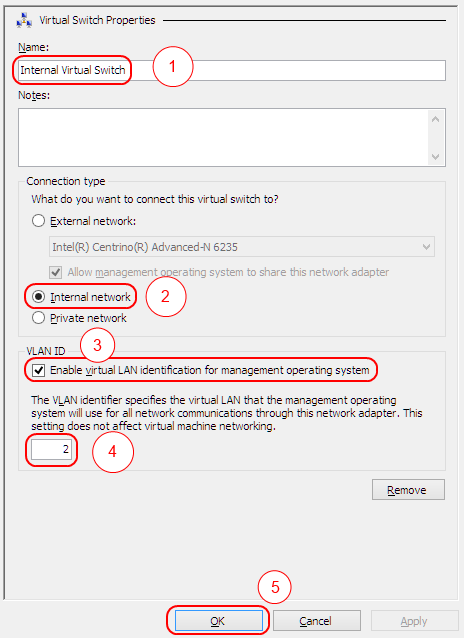
- Set the name of the switch (this will be important later on) (1); make sure that it’s an Internal network (2); Check the Enable virtual LAN identification for management operating system checkbox (3) and then assign an id (4) (this, along with the static ip addresses that will be set allow the guest and host Os’s to communicate); finally click OK (5).
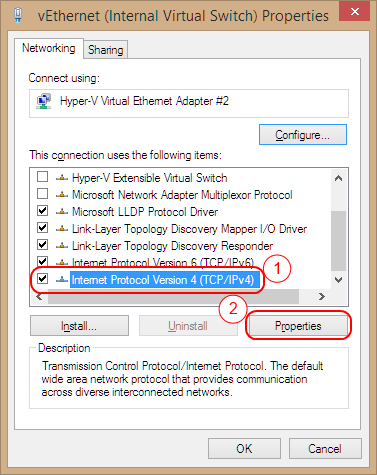
- Go to the Control Panel, then Network and Sharing Center and then click on Change adapter settings. Right click on the vEthernet (Internal Virtual Switch) and select Properties.

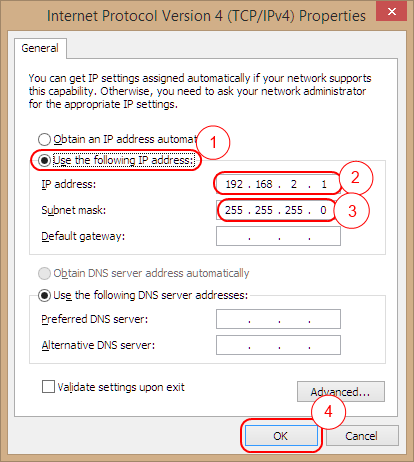
- In the list of items locate and click on the Internet Protocol Version 4 (TCP/IPv4) (1), and then click on the Properties (2) button.
- On the Internet Protocol Version 4 (TCP/IPv4) Properties change to the Use the following IP addess: radio button (1). In the IP address put in an address that won’t conflict with any of the networks you regularly use (2). In the Subnet mask put in 255.255.255.0 (3) (you can find out more about subnet masks here). Click on OK (4). Also OK the previous dialog.
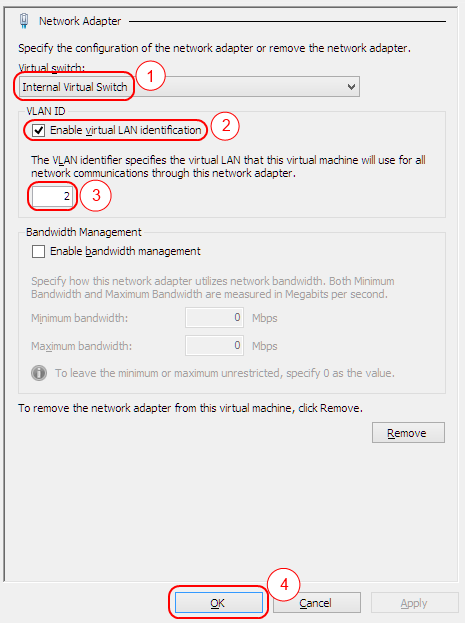
- The final step before installing your OS, but after creating your virtual machine is to ensure that there is one network adapter connected to the Internal Virtual Switch (1). Also the Enable virtual LAN identification (2) checkbox should be checked, and the identifier (3) set to the same one used in step 4. After changing any other settings click OK (4).
Installing a guest OS in your shiny new virtual machine is another thing beyond the scope of this article, but there is plenty of information out there. I chose to install Ubuntu Server LTS 14.04, other options are available.
Ubuntu Server (guest) setup
These instructions are based on the Internal Virtual Switch being connected to the first network adapter. If this is the case then this network adapter will be known in your (*nix based) guest as eth0.
- Log in to the guest operating system
-
Edit /etc/network/interfaces file. You will probably need to raise your privileges to edit the file using sudo:
sudo vim /etc/network/interfacesBy default when you start vim it puts you into command mode, you need to go into INSERT mode by pressing I.
-
Locate any existing section for the interface that connects to Internal Virtual Switch, and remove it. It will probably start with something similar to:
auto eth0
-
Insert the following entries into the file:
auto eth0
iface eth0 inet static
     address 192.168.2.2
     netmask 255.255.255.0
Of course this assumes that the interface is eth0 and the static address you have given the Internal Virtual Switch is 192.168.2.1.
-
Finally either reboot the vm, or reset the network interface that is connected to Internal Virtual Switch.
The internal switch can be reset using the ifdown/ifup commands, the vm can be rebooted using the reboot command.
Assuming that you installed SSH as part of the guest OS setup you should now be able to ssh into the server using the IP address set in step four.